Saturday, January 24, 2015

AQS Albuquerque

One of the first things I did in going to Albuquerque was learn to spell it!  That accomplished I walked into the beautiful Convention Center and drank my fill of gorgeous quilts by award winning quilters.  I was greatly humbled.  I didn't take pictures of all the top winners because I have seen some of them at other shows as well as published in one or more of the magazines to which I subscribe.  It is likely many of you have seen them too.

Best of show was for "Stars on Mars" (85"x85") by Gail Stapanek and Jan Hutchinson.  This was very striking with its high contrast, difficult construction and level of perfection.

Stars on Mars


************

Best Longarm Machine Quilting was for "Majestic Mosaic" (87"x86") by Karen Kay Buckley and Renae Haddadin.  The appliqué was impeccable and the quilting was unbelievable.

Majestic Mosaic


The winner for Best Home Machine Quilting (82"x96") was "Snow Flowers" by Susan Stewart.  The photos may not show how pristine white this quilt was, but believe me it was white as fresh snow.  The introduction of lace as a border element was unique and very beautiful.  The quilting is magnificent especially considering how large the quilt is.  It proves that we can do it on a domestic machine if we just keep practicing.

Snow Flowers


"Sunset Sentinel" (44"x39") by Cathy Geier. was a first place winner, but I don't know what category.  The tree was quite unique, made with black lace.  It had flecks of blue fabric encased behind the lace and was quilted with tiny pebbles.  What a great way to represent a tree in silhouette and suggest the myriad tiny branches and leaves.  I love it!

Sunset Sentinel


That's is for this week.  I will show some more next week.

BTW and OT another great personal accomplishment as a result of this trip was teaching the dog to ride and behave in a very frightening cage called an elevator, which bumps, moves, pings, has flashing lights and a very dangerous door that appears to be self-motivated.  She rode it like a champ by the time we headed home.

Sunday, January 18, 2015

Needles and Gadgets

I have sewn almost all my life, certainly since age six.  A needle, of course, is a necessary evil for those of us who sew, and there are many from which to choose.  I am talking today about the needles and gadgets I use during the machine quilting process.  You will need different styles for appliqué and hand quilting.

My go-to needle for burying threads into the nether regions of my quilt is a Quilt Basting Needle.  It is long.  It is thin.  It has a longish eye.  Length makes it possible to grab the needle easily to pull through the quilt.  Thin helps it go through tight places between stitches.  The long eye makes it easy to thread.  My #7 needles are 2 3/8 inches long.  Love 'em!  However, they can be hard to manage with short threads (read on for the work around).


Another option that I keep on hand are Easy Threading needles.  These allow the thread to slide through a gate from the top and are quick and easy to thread.  I find however that they can shred silk and polyester threads.  They may damage cotton thread, but it is not obvious.  If you are stuck with a short thread and the needle causes harm, you may find yourself squealing in frustration.  They are also shorter (mine are 1 7/8 inches), which may help with moderate length tails.


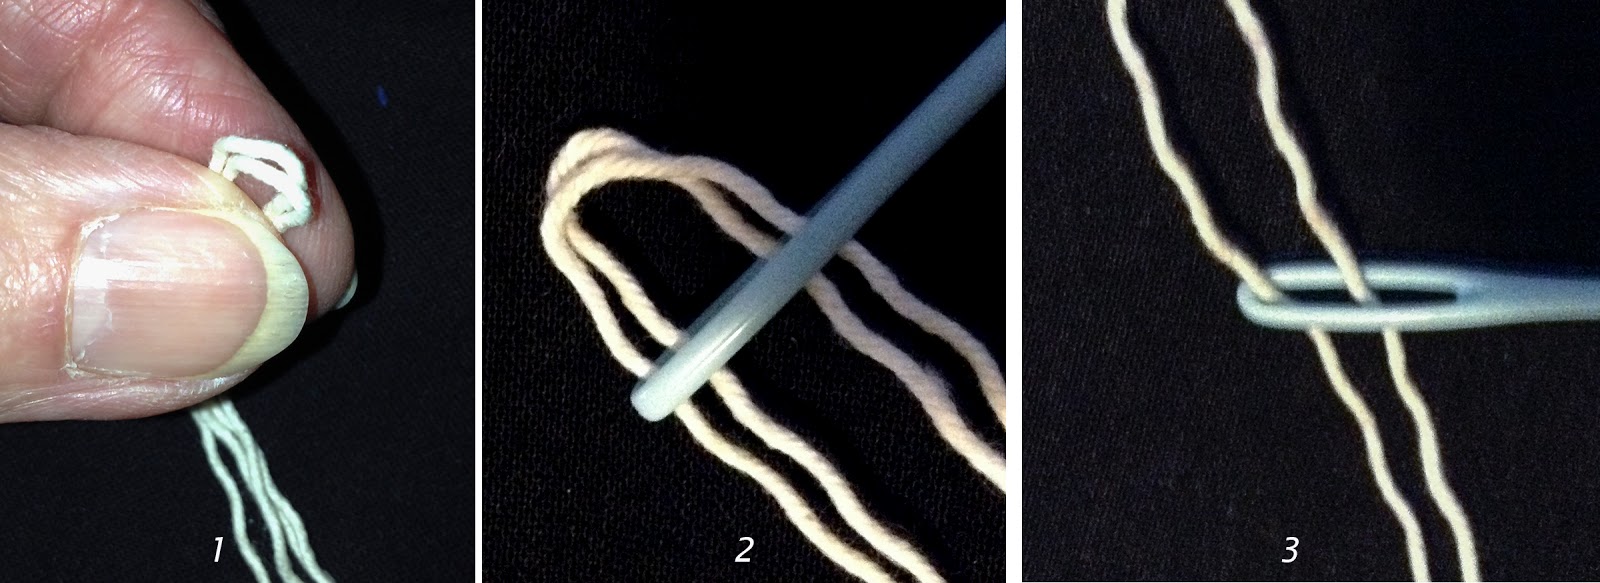
Sometimes it is hard to thread a standard needle, especially with two threads to manage.  I do it the way I was taught to thread a yarn needle.  Fold the two threads together as one, squash them between your thumb and forefinger and slip the eye of the needle over both loops.  Grab those loops and pull the ends of the thread through.  That's why I like the long eye of the basting needle.  In the photos I have used a yarn needle and string so it is easy to see.


Now for handling some problem situations.  Below are my favorite tools:


Looks like a surgical tray doesn't it?  I am sure you are familiar with the tweezers and needle threader.  The hemostat is a special tweezer that locks the grip of the pinchers.  It is a super tool for both medical and sewing needs!

Situation #1:  You have two threads that are only about 2-3 inches long.  By the time you have have the needle threaded you don't have enough thread leeway to get the needle into the fabric in the right place.
Solution:  Tie a square knot.  Use the tweezers to help if your fingers are getting in the way.  You can use a shorter needle.  You can try the Easy Threading needle, but if the thread shreds or breaks, you will have to move on to Situation #2.  I  like to run the long basting needle into the fabric and batting leaving the eye out about 1/2 inch.  Put the wire of the needle threader through the eye of the needle.  Using the tweezers pull the threads up through the wire and pull the threader with threads through the needle eye.  The hemostat pinchers are a bit thick for use with the needle threader so I use the skinny-pointed tweezers.

Situation #2:  You have two threads that are way to short to manage.  Never fear, you can do it.
Solution:  First you need to get a good knot tied.  The square knot and surgical knot are the options here.  I often get the threads tangled and have to start again, but the tweezers and hemostat will help greatly with the job.  I will grant you that it is not easy to tie short threads, but it is possible.  The hemostat is good for the surgical knot when one thread is a little longer.  Once the knot is tied you can get the threads through the eye of the needle with the needle threader as in Situation #1.

TIP:  If your threads are less than 1 inch long you need to rip a few more stitches out.  The knot should hold it under the fabric, but it will be more dependable with more tail attached.  I know that when I hand sew with silk thread the knot will pull right through if I don't beef it up a bit.

TIP:  If I know my thread tail length is iffy, I pull it through to a place where I know I will be quilting over it.  Just a little more insurance.

The hemostat is extremely useful for pulling a wedged needle through the fabric when it is hard to grasp and pull or if you have arthritic fingers.  Although not long, it can be a big help in turning a tube right side out.  It is one of my favorite gadgets.

I know this week's post is pretty basic, but it took time for me to develop reliable solutions to the needle and thread games so maybe it will help some of you.

I attended the AQS Quilt Show in Albuquerque last week and spent one day soaking up the fabulous work of award winning quilters such as Margaret Soloman-Gunn, Marilyn Badger, and Renae Haddadin among others.  The quilts were stunning.  The Egyptian tent makers were there too.  I plan to spend the next 2 or 3 posts on a vicarious visit to the show.  Please join me.

Monday, January 12, 2015

All Tied Up

You really don't want to have thread tails sticking out of your quilt.  In my early machine quilting classes I was told to stitch about five stitches very close together at the start and the end, pull up the bottom thread and cut the tails off close to the quilt top.  I was assured that the tiny ends would bury themselves in the batting.  I changed my method when one of my quilts came back from a show with the ominous evaluation, "Starts and Stops."  That means that the judge located some of my snipped off threads and found them distasteful.

Today I don't bother with the tiny start and stop stitches.  I start by bringing a long bobbin thread to the top, hold both threads out of the way, and get busy quilting.  When I stop I cut the top and bottom threads long and pull the bobbin one to the top.  I work on a domestic machine and find it easiest to tie off the tails immediately before I start the next line of stitching.  This way I never catch the old thread in the new sewing.  This also avoids accidentally leaving some loose ends.  I suppose you can still do the tiny stitches, but don't snip.  Bury your threads instead.

What do you do when that bobbin thread won't pull to the top?  Thread it on a needle and pull it through.  You can also pull the top thread to the back.  It makes no difference as long as you can tie a knot and bury the threads.

TIP:  Please don't leave loose ends.  They look really sloppy and if you show your quilt the judges will nail you every time.  If children find them they absolutely must pull on them - it is genetically impossible to avoid doing so.

There are three ways that I use to tie knots.  Knot #1 is what I think is called an overhand knot, which I use when my threads tails are nice and long.  You wrap the threads around two or three fingers, bring the ends through so that the intersection is at the same place where the thread comes out of the fabric.  Hold your thumbnail on the intersection where the needle hole is and gently pull the ends so the knot pulls tight right at the hole in the fabric.  (For the purpose of visualization I used string for these photos, but the process is the same)
Overhand Knot - pull the threads to finish the knot.
Knot #2 is the square knot, and I use that when I am dealing with shorter threads that are hard to wrap around my fingers.  Remember Girl or Boy Scouts?  Make one knot with the right thread over the left (1) and a second knot with the left thread over the right (2).
Square Knot
Knot #3 I call a desperation knot (it is actually a surgical knot).  The thread broke or the bobbin ran out or I have had to rip some quilting out and just can't get a long tail.  One of your threads has to be long enough to make a small circle.  Make a loop around a pair of tweezers with the longer thread, grab the short one with the tweezers, and pull it through.  Now do it again.

Desperation Knot
Once you have succeeded in tying a knot you thread a needle with the tails, pass it through the hole where the thread comes up, and then into the batting about one inch.  Pull gently until you hear the knot pop through the fabric and pull it a tiny bit tight before cutting the tails so they will slip out of sight when released.

TIP:  Be careful you don't go all the way through.  You don't want threads to show on the back of the quilt.

Getting the ends through the eye of a needle can be a trial sometimes.  I know you have all done it, but quilting offers unique challenges for this normally simple task.  Hang on, I will post about my methods and needles next week.

Monday, January 5, 2015

Return to Quilting

I am back after two wonderful weeks in Seattle for Christmas with family.  I love driving across the empty, snowy landscape.  It is always beautiful and reminds me of a quilt thrown across the hills like a freshly made bed.  I am home and eager to quilt, but must first clear and clean the house, write thank you notes and compose my annual letter.  January promises to be a very busy month.

My Christmas gifts included a set of 36 Derwent's Inktense pencils, which I have been dreaming of for months.  See Sherry Rogers-Harrison's website, which features some of her quilts on her Home page.  She does gorgeous quilting and then "paints" the designs with these pencils.  I am intrigued and can't wait to get started.

My other quilting-related acquisition is a design that my 15 year old granddaughter drew to decorate her father's iPad.  It is a stunning phoenix surrounded by zentangle-type patterns that will translate well into patchwork and quilting.  This very talented, young artist gave me permission to use it, and I have already translated it into quilt language.  I am eager to start, but have a lot of work to finish my current WIP.  Sometimes it is hard to be patient, but I find that creative ideas and sewing solutions present themselves better if I give them time to percolate through my brain.

HAPPY NEW YEAR.  I wish you lots of quilting fun.

Bagged the Bag

My first attempt at a picnic bag was a fail.  You saw the pictures last week.  I kept revising the design.  I clipped where I shouldn't ...